之前参与了公司的开发板体验活动,之前在地平线的开发者社区也发布了开箱及上手体验,具体地址在这里,今天这篇博客主要体验下板子对应的天工开物工具链,完成模型的转换及部署,同时也比较下x3派和之前的Intel ncs2计算棒的性能。
1.天工开物工具链试用
个人理解x3派和树莓派等一些普通的arm开发板相比,最主要的优势就是x3pi上带有bpu模块,可以加速神经网络计算
工具链官方文档在这里https://developer.horizon.ai/api/v1/fileData/doc/cn/index.html#x3j3,整体来说官方文档非常完善,用户可能用到的细节都包括了,不过对于新手来说可能有点太过全面,直接看可能会找不到。
从一个完全没有用过工具链同学的角度来说,可能更需要一个简单的例子体验一下从工具链环境准备、模型转换示例、模型转换好后该如何在板上infer,接下来我就先从这三个方面来体验下天工开物工具链:
1.1工具链环境搭建
工具链环境主要需要两部分,一个是具体的运行环境以docker镜像(docker_openexplorer_centos_7_xj3_v2.3.3.tar.gz)的形式发布,另一个是工具链压缩包(horizon_xj3_open_explorer_v2.3.3_20220727.tar.gz),主要包括了转换工具及示例。这俩部分都可以从资源中心下载,这里我下载了2.3.3的docker镜像(2.2.3的镜像像是有问题,导入失败),官方的docker hub repo中也提供了镜像可以直接docker pull不过我建议还是先下载好镜像压缩包然后再手动导入(直接docker pull速度可能非常慢),导入时直接执行
docker image load -i docker_openexplorer_centos_7_xj3_v2.3.3.tar.gz 就可以,导入成功后docker image ls就可以看到对应的镜像

导入docker成功后,进入解压好的工具链文件夹,下面有docker run脚本,脚本主要内容就是把整个工具链文件夹及数据集文件夹挂载到镜像生成的容器中,如果是自己导入镜像的话,由于镜像名称发生变化,这个脚本执行起来会有问题,需要手动改下脚本里的image name。
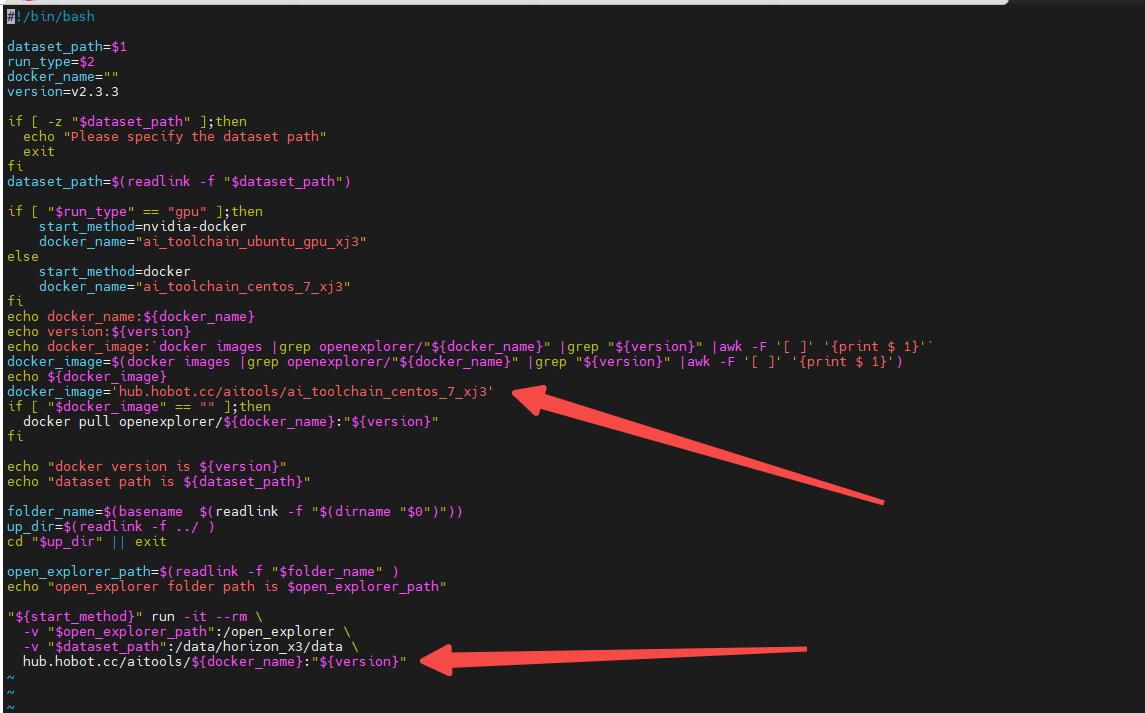
修改晚后执行脚本就可以进入到docker容器中,我们执行一下hb_mapper及hbdk-cc命令输出正常,说明整个环境已经OK,hb_mapper为模型转换工具,hbdk-cc为模型编译工具
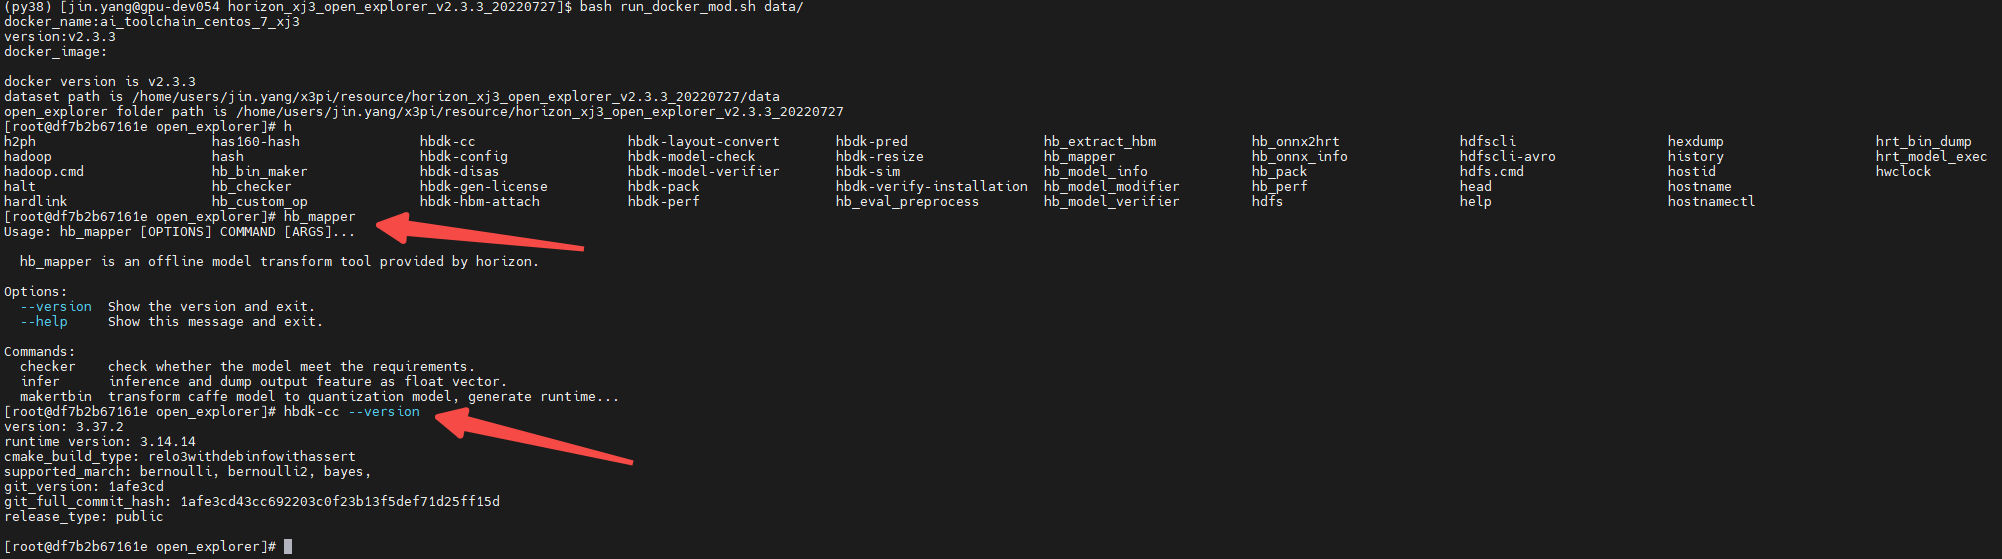
这里插播一下,作为地平线的算法工程师我们平时工作中常用的是hbdk-cc,因为我们内部的模型都是采用的都是量化训练方案,训好的模型,直接用hbdk-cc编译为hbm模型,一开始看到我们板子上模型都是bin结尾的还有点奇怪,还顺手试了下直接在开发板上用easy_dnn 库load业务hbm模型发现没法load。后来看了下工具链的文档,搞清楚了bin和hbm的区别,目前我们x3派提供的是后量化模型转换的方案 。
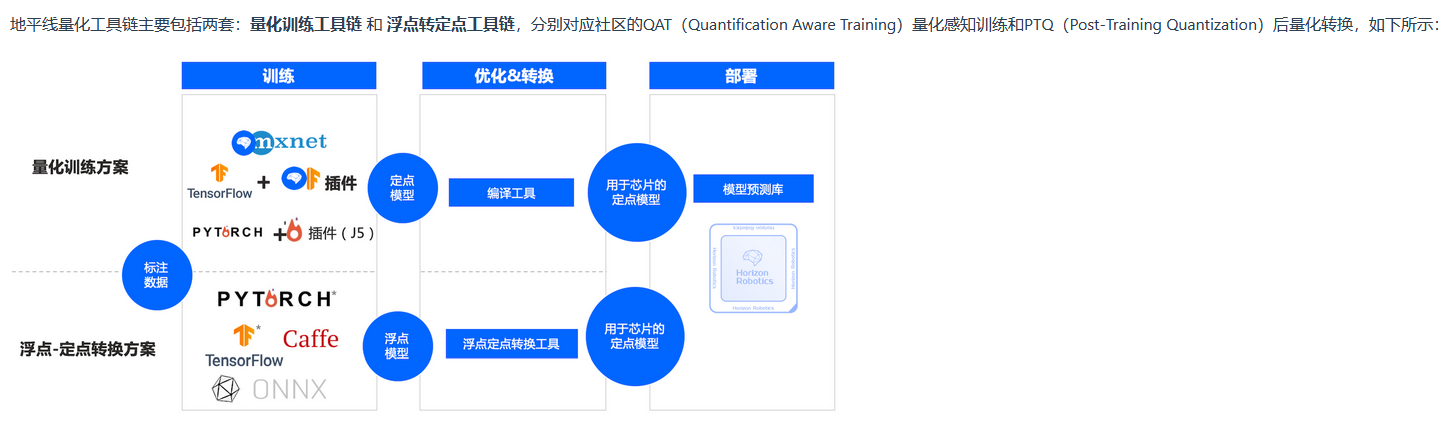
量化训练方案
浮点转定点工具

环境搞定,接下来就进行模型转换工作,我们以最简单的分类任务为例,介绍下整个模型转换流程,这里我以mobilenetv2_onnx模型为例进行介绍,进入到工具链对应samples文件夹下,主要由几个脚本文件构成,还有一个对应名称的yaml文件
完成模型转换的话其实前三步就够用了,01脚本check模型中所有op是否支持,02脚本生成模型需要的校准数据,03脚本完成模型的转换,yaml文件配置了整个模型转换配置,包括模型输入、校准、编译这几部分。yaml里哪些参数具体是什么意思,有什么设置的选项,注释已经写的比较清楚了

直接按照顺序执行相应的脚本就可以,这里贴一下执行03模型转换脚本的输出。
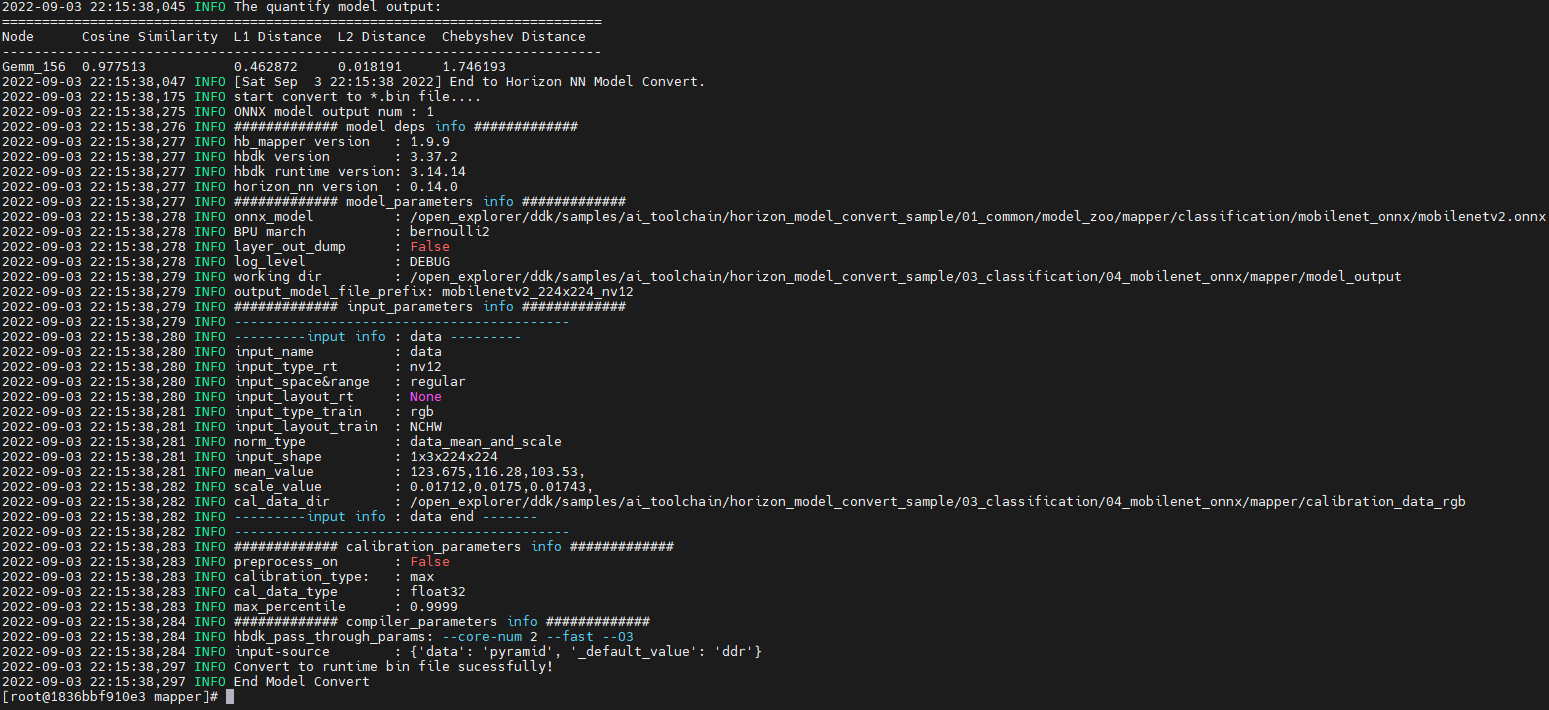
执行完后在model_output文件夹下就可以看到编译好的模型bin文件了。有了bin文件我们就可以在板子使用easy_dnn接口加载模型然后进行infer了。infer之前有一点需要特别注意就是转换好模型的输入数据格式应该是什么。
这里我们看一下模型转换时input相关的参数,就是yaml里对应设置的部分,原始onnx模型输入数据格式为rgb,输入大小为1x3x224x224,我们转换好的模型输入为nv12,输入部分的从nv12到rgb格式转换及数据归一化都是模型转换工具帮我们直接添加到转换好的模型中,所以我们转换好的模型输入的数据应该为nv12格式。
明确了模型输入的格式接下来我们试一下在板子上infer模型,这部分代码其实可以直接复用板子上/app/ai_inference/01_basic_sample/test_mobilenetv1.py的代码,模型的路径改一下,这里我还加了下forward测速的部分,实际测一下模型infer的速度
#!/usr/bin/env python3

from hobot_dnn import pyeasy_dnn as dnn
import numpy as np
import cv2
import time


def bgr2nv12_opencv(image):
    height, width = image.shape[0], image.shape[1]
    area = height * width
    yuv420p = cv2.cvtColor(image, cv2.COLOR_BGR2YUV_I420).reshape((area * 3 // 2,))
    y = yuv420p[:area]
    uv_planar = yuv420p[area:].reshape((2, area // 4))
    uv_packed = uv_planar.transpose((1, 0)).reshape((area // 2,))

    nv12 = np.zeros_like(yuv420p)
    nv12[:height * width] = y
    nv12[height * width:] = uv_packed
    return nv12

def print_properties(pro):
    print("tensor type:", pro.tensor_type)
    print("data type:", pro.dtype)
    print("layout:", pro.layout)
    print("shape:", pro.shape)


def get_hw(pro):
    if pro.layout == "NCHW":
        return pro.shape[2], pro.shape[3]
    else:
        return pro.shape[1], pro.shape[2]

if __name__ == '__main__':
    model_path = './resource/model_output_all_core/mobilenetv2_224x224_nv12.bin'
    model_path = './resource/model_output/mobilenetv2_224x224_nv12.bin'
    print('model_path:',model_path)
    models = dnn.load(model_path)
    print(models)
    print("=" * 10, "inputs[0] properties", "=" * 10)
    print_properties(models[0].inputs[0].properties)
    print("inputs[0] name is:", models[0].inputs[0].name)

    print("=" * 10, "outputs[0] properties", "=" * 10)
    print_properties(models[0].outputs[0].properties)
    print("outputs[0] name is:", models[0].outputs[0].name)

    img_file = cv2.imread('./resource/zebra_cls.jpg')
    h, w = get_hw(models[0].inputs[0].properties)
    des_dim = (w, h)
    resized_data = cv2.resize(img_file, des_dim, interpolation=cv2.INTER_AREA)
    nv12_data = bgr2nv12_opencv(resized_data)

    start = time.perf_counter()
    outputs = models[0].forward(nv12_data)
    end = time.perf_counter()
    print('forward time:',end-start)

    print("=" * 10, "Get output[0] numpy data", "=" * 10)
    print("output[0] buffer numpy info: ")
    print("shape: ", outputs[0].buffer.shape)
    print("dtype: ", outputs[0].buffer.dtype)
    # print("First 10 results:", outputs[0].buffer[0][:10])

    print("=" * 10, "Classification result", "=" * 10)
    assert np.argmax(outputs[0].buffer) == 340
    print("cls id: %d Confidence: %f" % (
    np.argmax(outputs[0].buffer), outputs[0].buffer[0][np.argmax(outputs[0].buffer)]))

    forward_times = 10000
    inputs = []
    for _ in range(forward_times):
        dummy_input = np.random.randint(0, 255, size=[int(224 * 224 * 1.5)]).astype(np.uint8)
        inputs.append(dummy_input)
    start = time.perf_counter()
    outs = []
    for t in range(forward_times):
        outputs = models[0].forward(inputs[t])
        # outs.append(outputs)
    end = time.perf_counter()
    # print('forward time:', end - start)
    print(f'forward {forward_times} times, total speed {end - start} s')
    print(f'fps is {1/((end - start)/forward_times)}')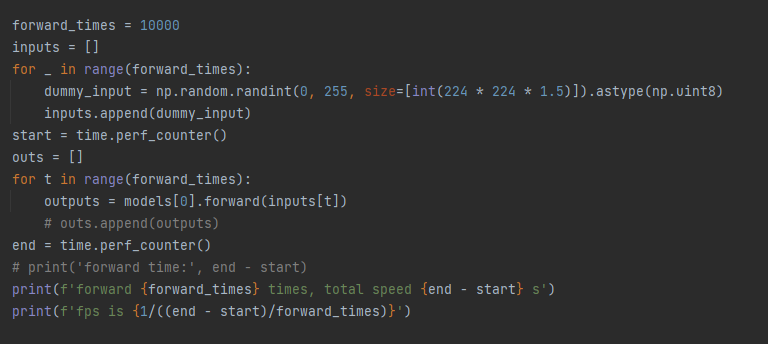
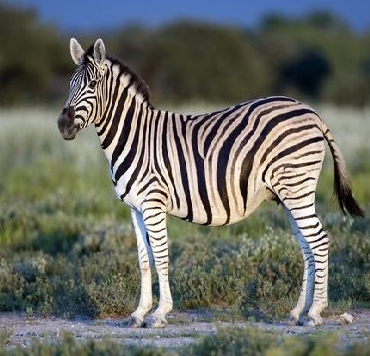
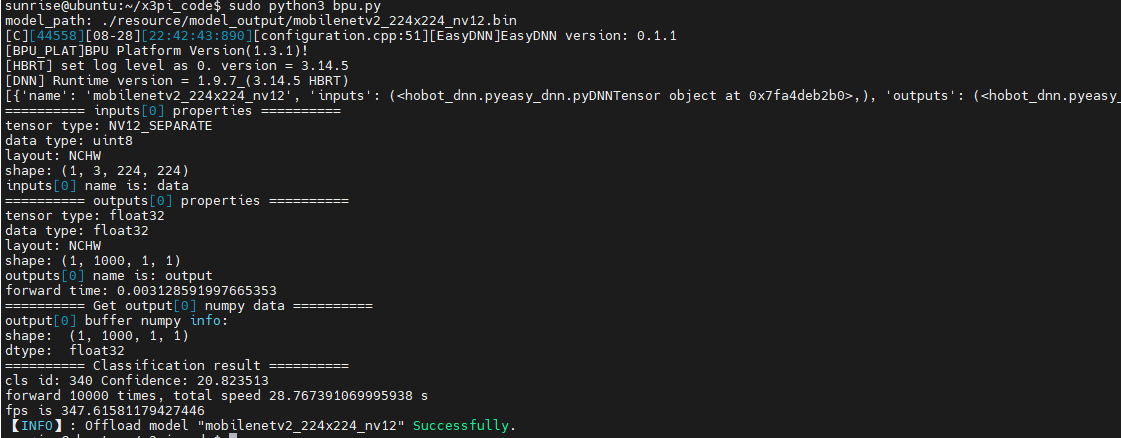
执行下代码,可以看到对这张斑马图片识别正确,mobilenetv2模型在板子上forward 10000次一共花了28.7s,fps约为347,这个速度我只能套用一句马老师的名言(手动狗头),刷一下很快啊,我们的bpu确实有点东西。
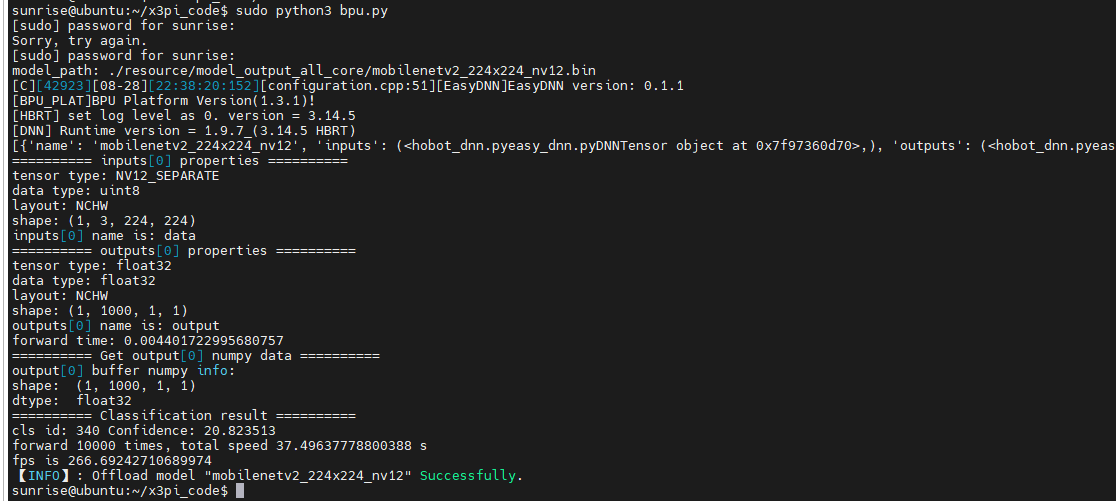
到这里我们工具链的整个使用流程就走完了。这里我还尝试了修改模型编译使用的bpu核数默认编译参数使用单核,我们修改为2核,但我实际测出来2核的fps为266竟然没有单核的高?
这个不太符合预期得问问我们工具链的同学,是哪里操作不正确
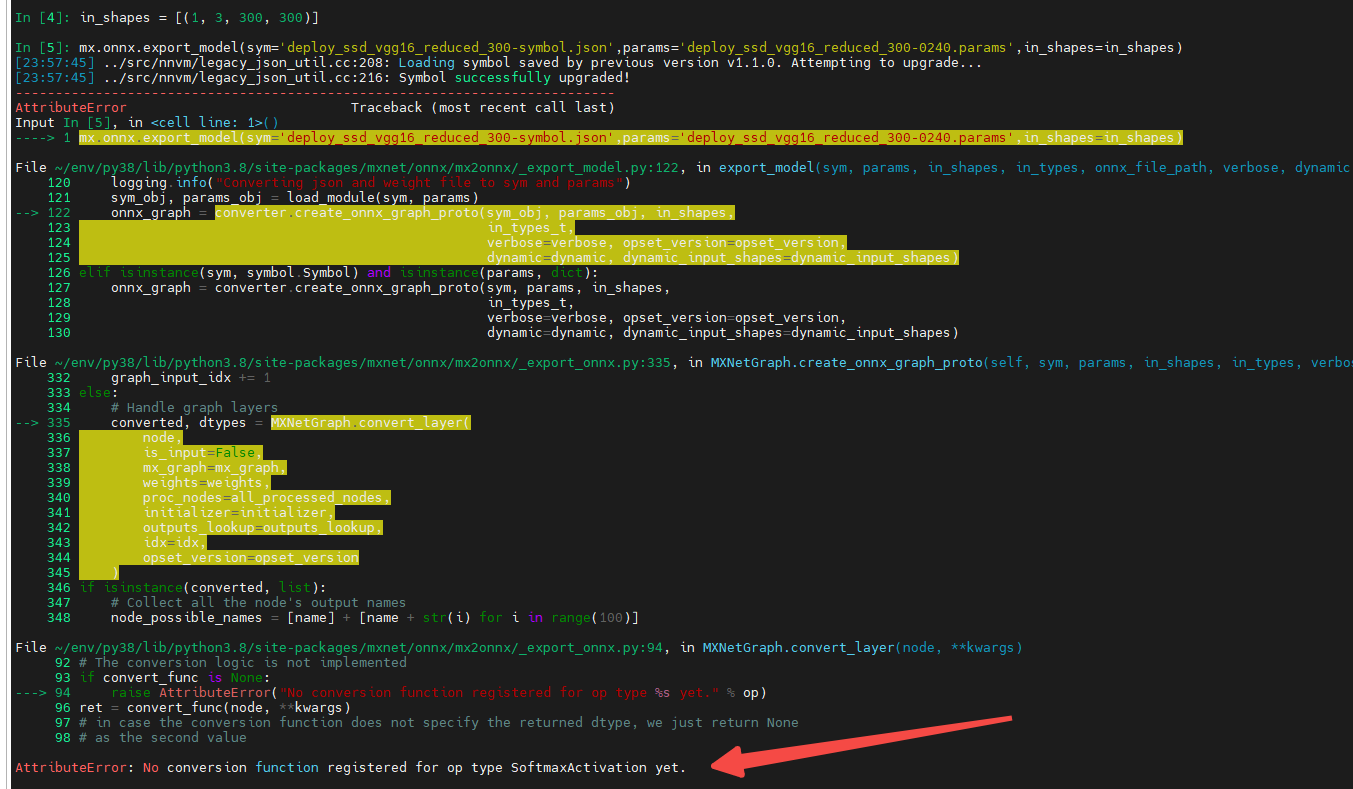
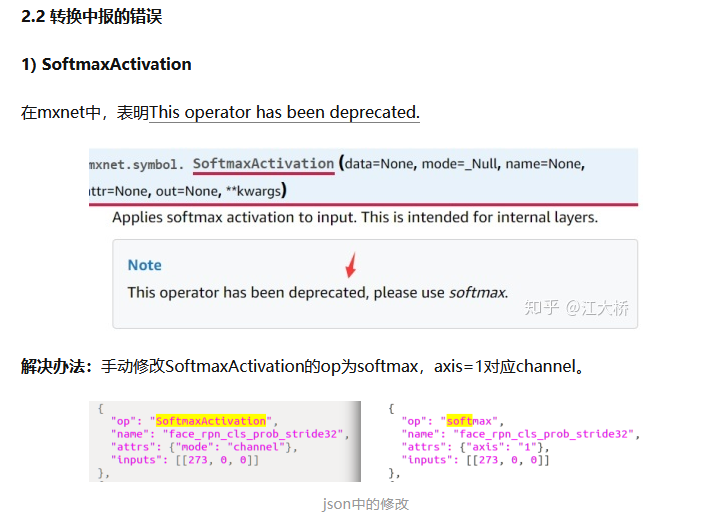
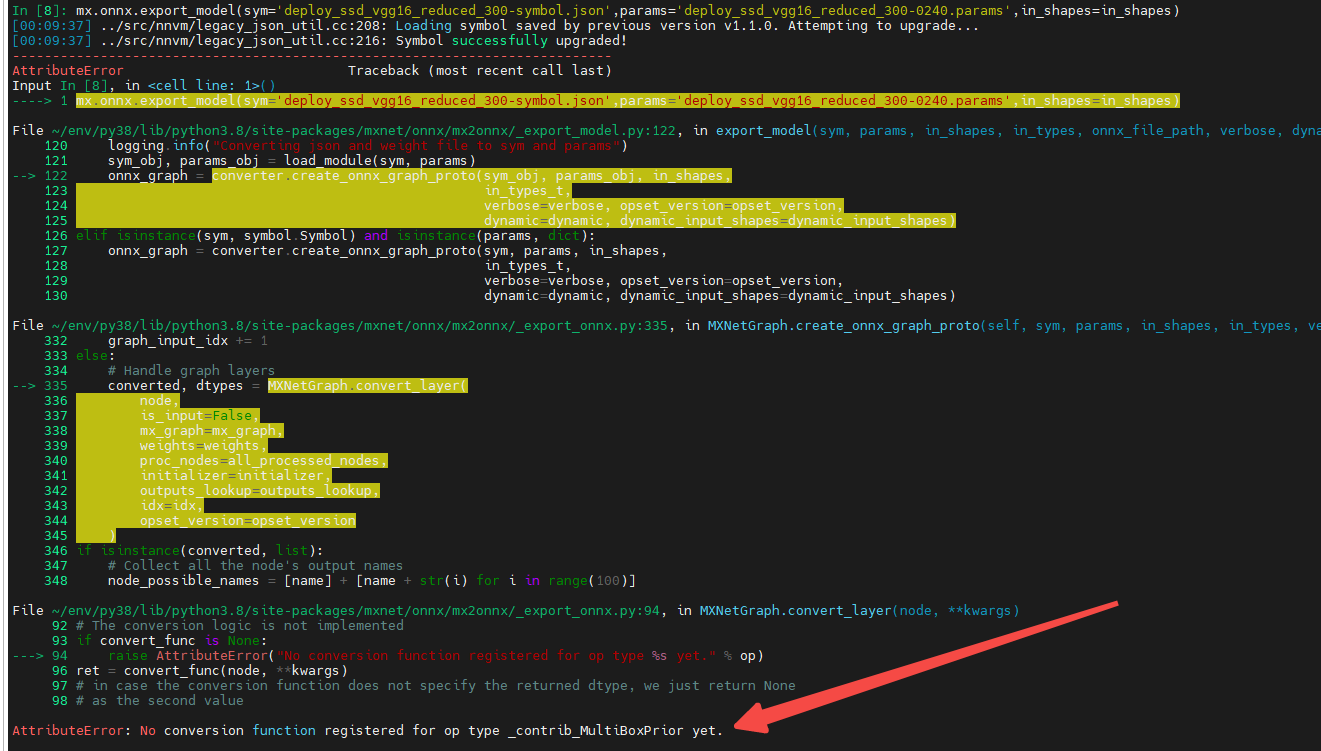
本来我想在板子上跑一下读研时训练的mxnet ssd模型,但转换onnx就遇到了问题,一个是softmaxactivation op的问题这个查阅资料(https://zhuanlan.zhihu.com/p/166267806)是可以替换的
但ssd中anchor相关的一些op onnx还没有支持(https://github.com/onnx/onnx/issues/2086),理论上这部分可以先从模型中去掉,然后把这部分操作放在cpu上去实现,这块我也没有再花时间再去实现。
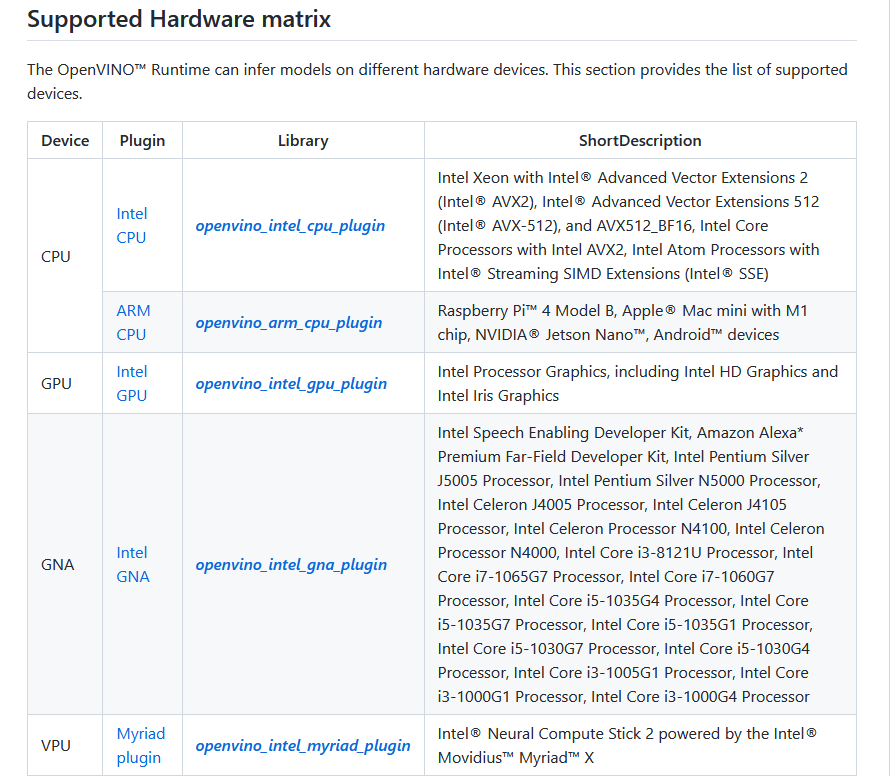
Intel NCS2 比较
上面我们体验了我们的天工开物工具链,接下来我们进入x3派bpu vs Intel ncs2(vpu)的pk环节
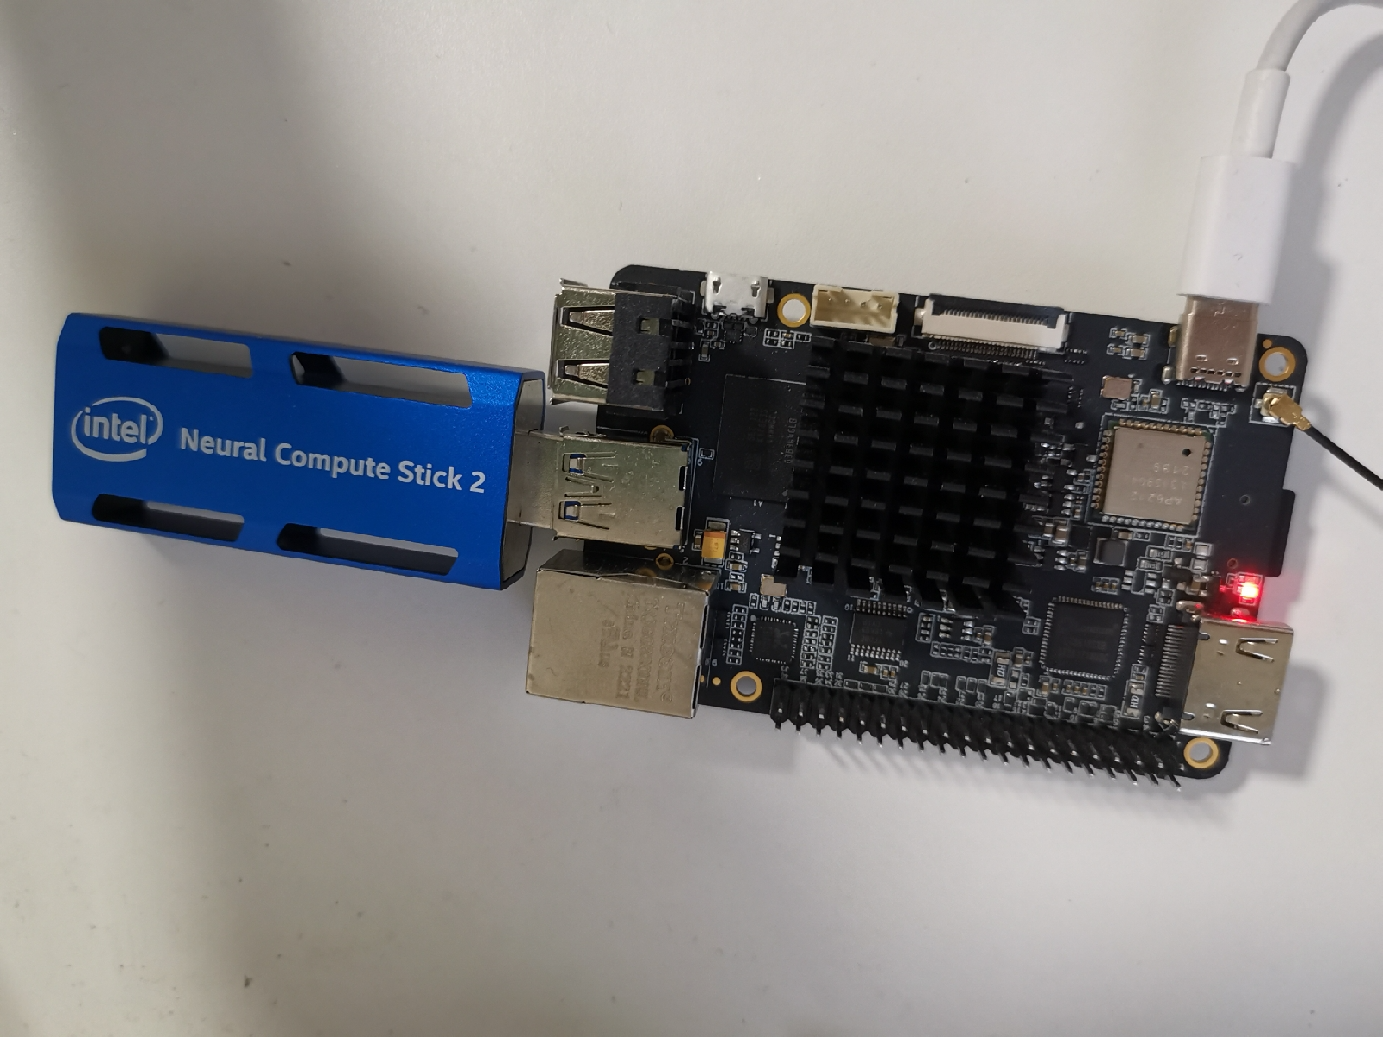
Intel ncs2计算棒这里也不进行详细的介绍了,计算棒上市的时间也比较早了,ncs2计算棒需要配合Intel的openvino框架,2019年我还在读研的时候,就使用过openvino,当时在pc及树莓派上都进行过尝试,总体来说使用难度不算复杂。
为了在x3派上使用ncs2计算棒,我也又看了最新openvino的文档,看起来openvino框架也一直在更新,安装方式也和2019年不一样了,模型在不同设备上的运行按照plugin的方式来区分,ncs2计算棒需要配合单独的插件。
虽然现在openvino已经支持pip安装,myriad插件默认是不带的(pc上进行了测试),而且试了下我们板子上py38的环境pip也是没法正常安装openvino的。

所以基于上述两点想在x3派上使用ncs2加速棒,需要我们手动在板子上编译openvino框架。
1.x3派上openvino框架编译
openvino官方文档也比较完善各个系统都有对应的说明,我们开发板的架构为为aarch64(arm64),系统是Ubuntu 20.04,gcc版本为9.4.0,按照Linux通用的编译说明来就行。
我们板子是arm架构的如果想在arm cpu上使用openvino跑模型还需要arm_plugin,arm_plugin是在另一个openvino_contrib这个repo中,
https://github.com/openvinotoolkit/openvino/wiki/BuildingForLinux
https://github.com/openvinotoolkit/openvino_contrib/tree/master/modules/arm_plugin
其实上面两个文档已经写的比较清楚了,我这里列一下我直接操作的命令,clone submodule时候可能由于网络的原因会失败,建议挂个梯子,或者多试几遍保证这些依赖的submodule是成功clone的
#1.install deps
sudo apt-get update
sudo apt-get install -y git cmake  scons build-essential
#2.clone repo
# pwd: /home/sunrise
git clone  https://github.com/openvinotoolkit/openvino_contrib.git
cd openvino_contrib
git submodule update --init --recursive
cd ..
git clone https://github.com/openvinotoolkit/openvino.git
cd openvino
git submodule update --init --recursive
#3.compile
mkdir build && cd build
cmake -DIE_EXTRA_MODULES=/home/sunrise/openvino_contrib/modules/ -DCMAKE_BUILD_TYPE=Release -DBUILD_java_api=OFF -DBUILD_cuda_plugin=OFF -DENABLE_PYTHON=ON  ..
make -j2
下图是正常编译过程中的输出

整体来说编译比较顺利没啥坑,唯一需要注意的是内存不足的问题。
由于我拿到的板子是2g内存版,编译过程中可能出现内存不够导致编译中断的情况(所以强烈建议大家购买4g版本,多50元买不了吃亏买不了上当)。
这里我们需要开启下虚拟内存,可以按照国晟哥之前写的贴子操作https://developer.horizon.ai/forumDetail/98129467158916281

htop验证下swp变为1g,继续执行make编译就行

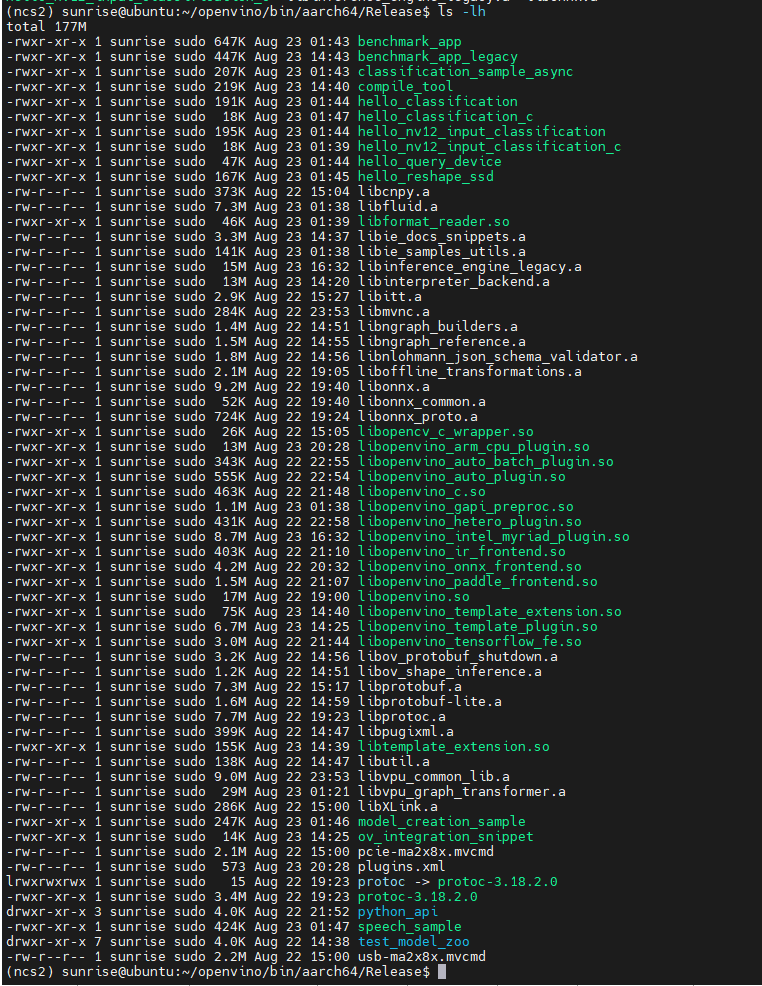
经过漫长的编译时间(十几个小时),openvino就编译成功了,编译好的依赖库及二进制文件都在openvino/bin文件夹下
执行下hello_query_device二进制文件,在x3派上插上ncs2,查询下支持的设备,可以看到arm_cpu和myriad插件都成功安装
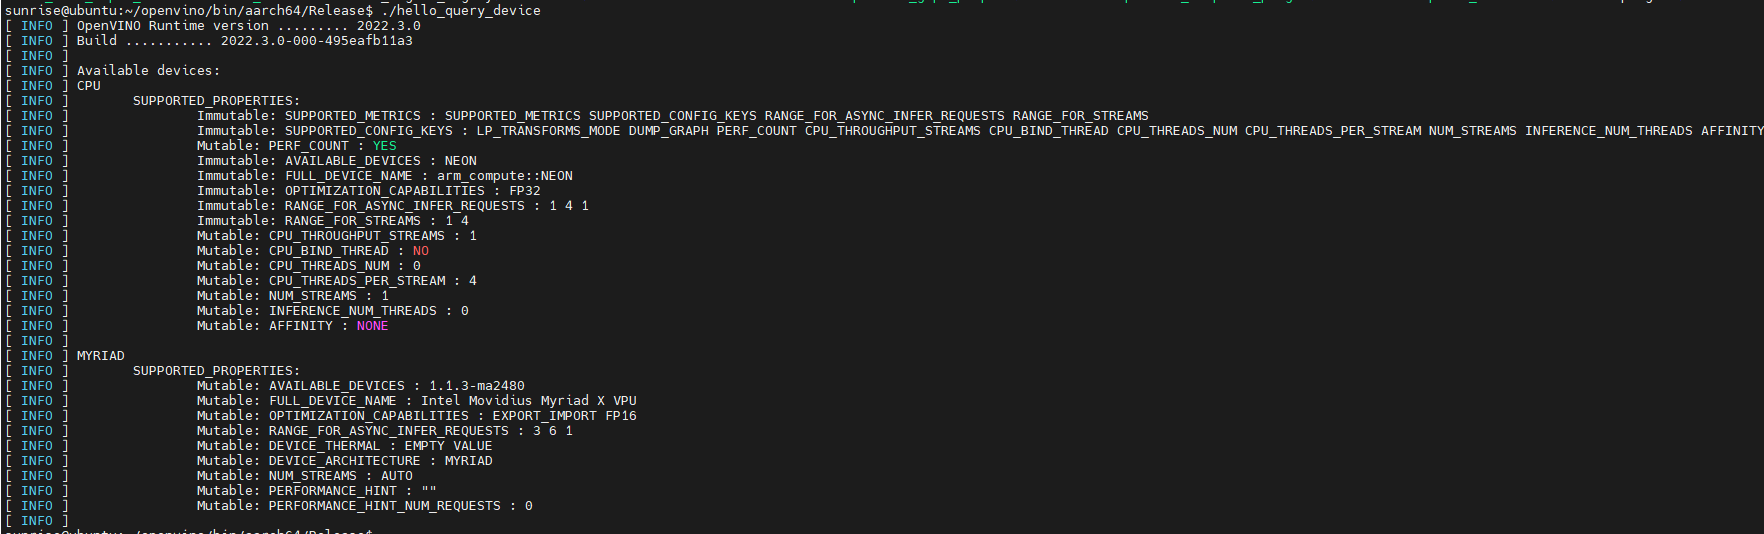
这里还有一点需要特别注意,Linux上使用计算棒的话还需要设置udev,虽然query_device已经可以看到计算棒,但是不设置udev的话到时候使用计算棒跑模型会报错
官方文档里也提供了udev的设置脚本,
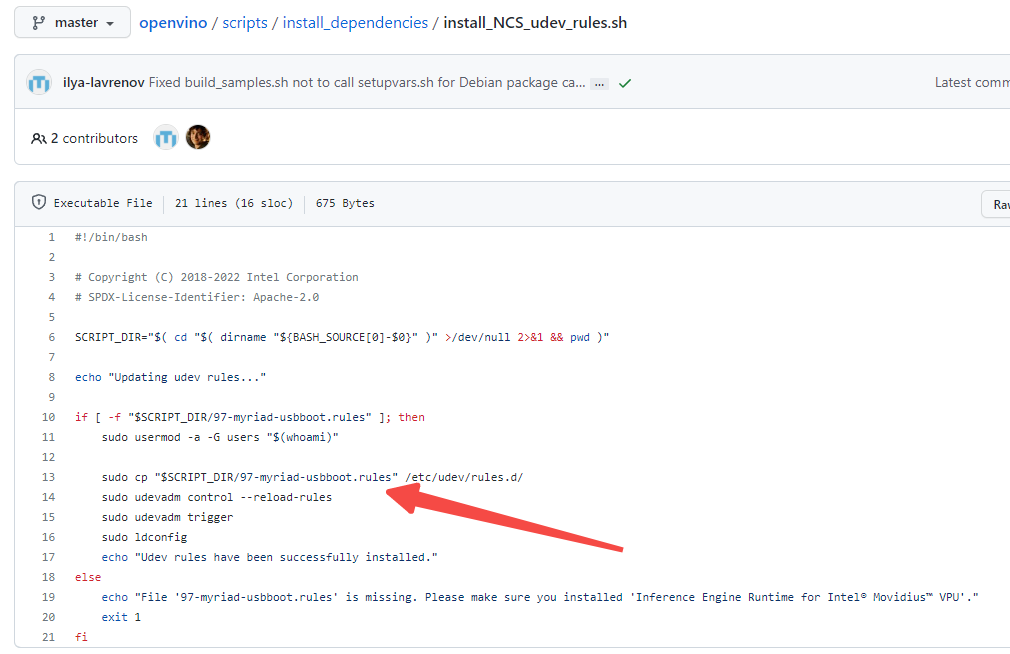
但这里有个坑,这个rules文件在master分支上已经找不到了,翻了半天之前的文档以及脚本,才在历史版本中找到了rules文件的位置
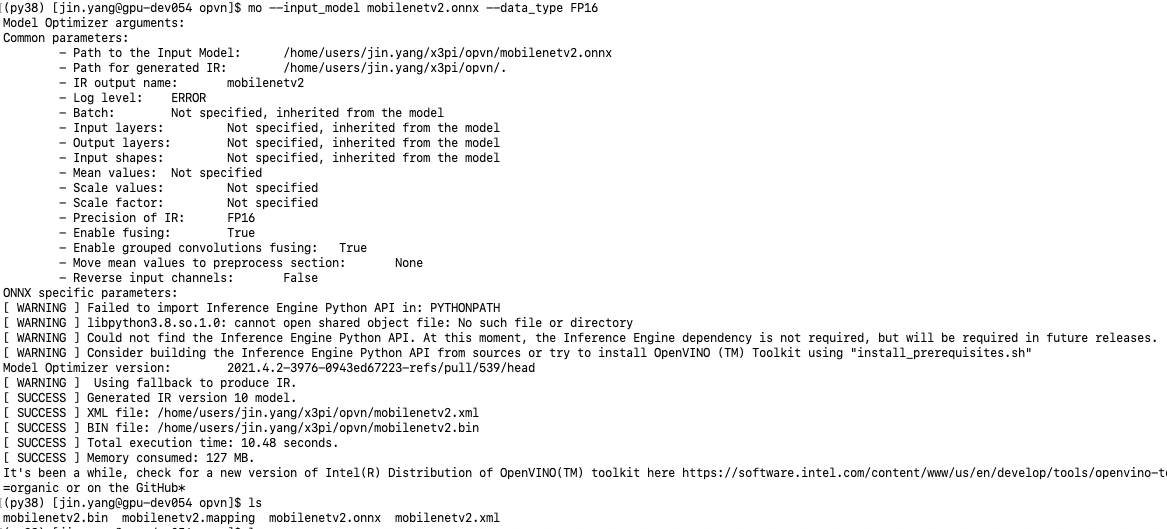
openvino已经编译好了,openvino框架也需要进行模型的转换,这里我们同样使用上一节天工开物工具链示例里的mobilenetv2 onnx模型进行转换。
这块的转换参数没有指定太多,只是data_type需要注意,ncs2只支持FP16的模型,转换好之后可以看到对应的xml和bin文件,xml为网络结构 bin为网络参数
模型转换好之后就是forward环境,这里我同样在openvino的hello_classification示例基础上替换模型路径加入forward测试fps的代码
import logging as log
import cv2
import numpy as np
from openvino.preprocess import PrePostProcessor, ResizeAlgorithm
from openvino.runtime import Core, Layout, Type
from openvino.preprocess import ColorFormat
import time
if __name__ == "__main__":
model_path = './resource/mobilenetv2_cls/mobilenetv2.xml'
image_path = 'resource/zebra_cls.jpg'
device_name = 'CPU'
# device_name = 'MYRIAD'
log.info = print
log.info('Creating OpenVINO Runtime Core')
core = Core()
# --------------------------- Step 2. Read a model --------------------------------------------------------------------
log.info(f'Reading the model: {model_path}')
# (.xml and .bin files) or (.onnx file)
model = core.read_model(model_path)
print(model)
if len(model.inputs) != 1:
log.error('Sample supports only single input topologies')
exit(-1)
if len(model.outputs) != 1:
log.error('Sample supports only single output topologies')
exit(-1)
# --------------------------- Step 3. Set up input --------------------------------------------------------------------
# Read input image
image = cv2.imread(image_path)
resized_data = cv2.resize(image, (224,224), interpolation=cv2.INTER_AREA)
# Add N dimension
input_tensor = np.expand_dims(resized_data, 0)
# --------------------------- Step 4. Apply preprocessing -------------------------------------------------------------
ppp = PrePostProcessor(model)
_, h, w, _ = input_tensor.shape
# 1) Set input tensor information:
# - input() provides information about a single model input
# - reuse precision and shape from already available `input_tensor`
# - layout of data is 'NHWC'
ppp.input().tensor() \
.set_shape(input_tensor.shape) \
.set_element_type(Type.u8) \
.set_color_format(ColorFormat.BGR) \
.set_layout(Layout('NHWC')) # noqa: ECE001, N400
# 2) Adding explicit preprocessing steps:
# - apply linear resize from tensor spatial dims to model spatial dims
ppp.input().preprocess() \
.convert_element_type(Type.f32) \
.convert_color(ColorFormat.RGB) \
.mean([123.675,116.28,103.53]) \
.scale([1/0.01712,1/0.0175,1/0.01743])
# 3) Here we suppose model has 'NCHW' layout for input
ppp.input().model().set_layout(Layout('NCHW'))
# 4) Set output tensor information:
# - precision of tensor is supposed to be 'f32'
ppp.output().tensor().set_element_type(Type.f32)
# 5) Apply preprocessing modifying the original 'model'
model = ppp.build()
# --------------------------- Step 5. Loading model to the device -----------------------------------------------------
log.info('Loading the model to the plugin')
compiled_model = core.compile_model(model, device_name)
# --------------------------- Step 6. Create infer request and do inference synchronously -----------------------------
log.info('Starting inference in synchronous mode')
results = compiled_model.infer_new_request({0: input_tensor})
# --------------------------- Step 7. Process output ------------------------------------------------------------------
predictions = next(iter(results.values()))
# Change a shape of a numpy.ndarray with results to get another one with one dimension
probs = predictions.reshape(-1)
# Get an array of 10 class IDs in descending order of probability
top_10 = np.argsort(probs)[-10:][::-1]
header = 'class_id probability'
log.info(f'Image path: {image_path}')
log.info('Top 10 results: ')
log.info(header)
log.info('-' * len(header))
for class_id in top_10:
probability_indent = ' ' * (len('class_id') - len(str(class_id)) + 1)
log.info(f'{class_id}{probability_indent}{probs[class_id]:.7f}')
log.info('')
forward_times = 100
inputs = []
for _ in range(forward_times):
dummy_input = np.random.randint(0, 255, size=[1, 3,224,224]).astype(np.uint8)
inputs.append(dummy_input)
start = time.perf_counter()
outs = []
for t in range(forward_times):
# outputs = models[0].forward(inputs[t])
results = compiled_model.infer_new_request({0: inputs[t]})
# outs.append(outputs)
end = time.perf_counter()
print('run_device:',device_name)
# print('forward time:', end - start)
print(f'forward {forward_times} times, total speed {end - start} s')
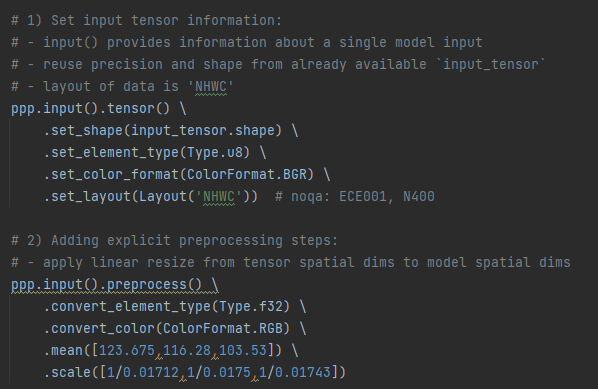
print(f'fps is {1 / ((end - start) / forward_times)}')这里有一点还需要注意,默认代码中的preprocess部分格式需要正确,使用的onnx模型原始输入为rgb数据,送入网络的图片为bgr格式,这块需要进行bgr2rgb的通道转换以及数据的归一化,不然infer的结果会不正确,这里我也试了将输入格式也设置为nv12,但ncs2上目前还不支持。
执行上面的代码,输入同样是斑马图片,可以看到分类输出id为340,分类正确。
arm_cpu
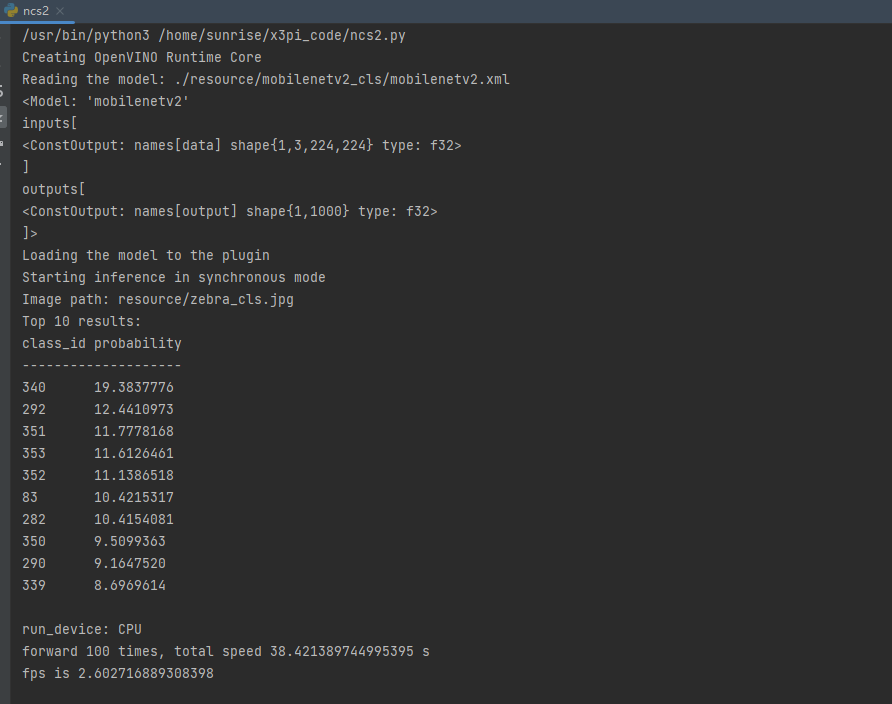
ncs2速度
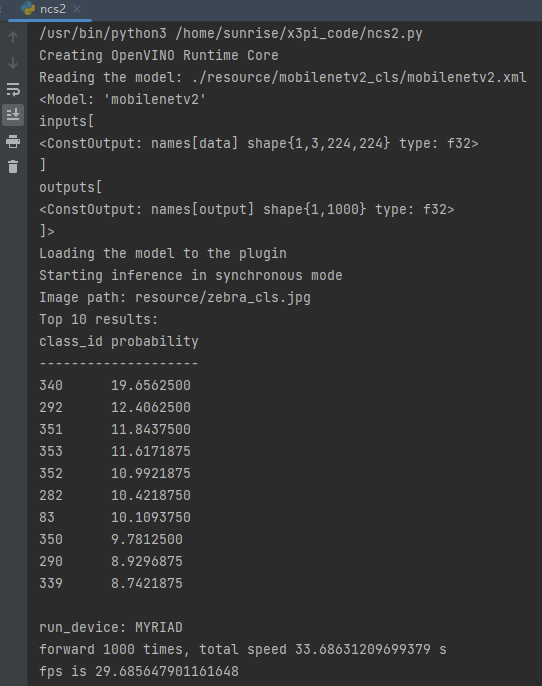
| bpu(单核) | arm_cpu | ncs2 | |
| mobilenetv2 | 347fps | 2.6fps | 29.7fps |

可以看到我们的bpu帧率秒杀ncs2计算棒,虽然比较时不是完全严格控制变量(比如bpu为int8模型,ncs2为fp16模型),可能在一些没有神经网络加速单元的芯片上ncs2加速棒能起一些加速作用,但和bpu相比ncs2的算力确实是弱爆了。